9HTTP



 2 min read


Created a browser profile to check an overseas advertising landing page, but the page still displays content for your local region? Creating a profile is only part of the setup. You also need to configure its proxy and verify the actual exit IP.
This guide explains how to connect 9HTTP proxies to BitBrowser, from obtaining connection details to testing the proxy and checking business pages.
1. Choose a 9HTTP Proxy for Your Workflow
BitBrowser manages browser profiles, while 9HTTP provides the proxy connection. Think of a profile as a workspace and its proxy as the network route that connects it to websites.
9HTTP offers the following proxy products. Choose according to your target locations, session duration, and traffic requirements.
| Product | Main Features | Suitable Workflows |
|---|---|---|
| Dynamic Residential Proxies | Rotating and sticky sessions, with traffic-based billing | Advertising verification and market research across regions |
| Long Acting Static ISP | Fixed IP addresses for consistent, long-term connections | Authorized store management and ongoing regional monitoring |
| Unlimited Residential Proxies | Unlimited traffic, with bandwidth-based and port-based plans | Continuous, high-volume data collection conducted in compliance with applicable requirements |
When checking several pages in sequence, review the session persistence conditions. For workflows requiring the same exit IP over a longer period, consider Long Acting Static ISP.
Saving a browser profile does not turn a dynamic proxy into a fixed-IP connection.
2. Obtain Your 9HTTP Proxy Connection Details
Log in to the 9HTTP dashboard and open the connection details or configuration page for your purchased product. Prepare the proxy protocol, host, port, username, and password.
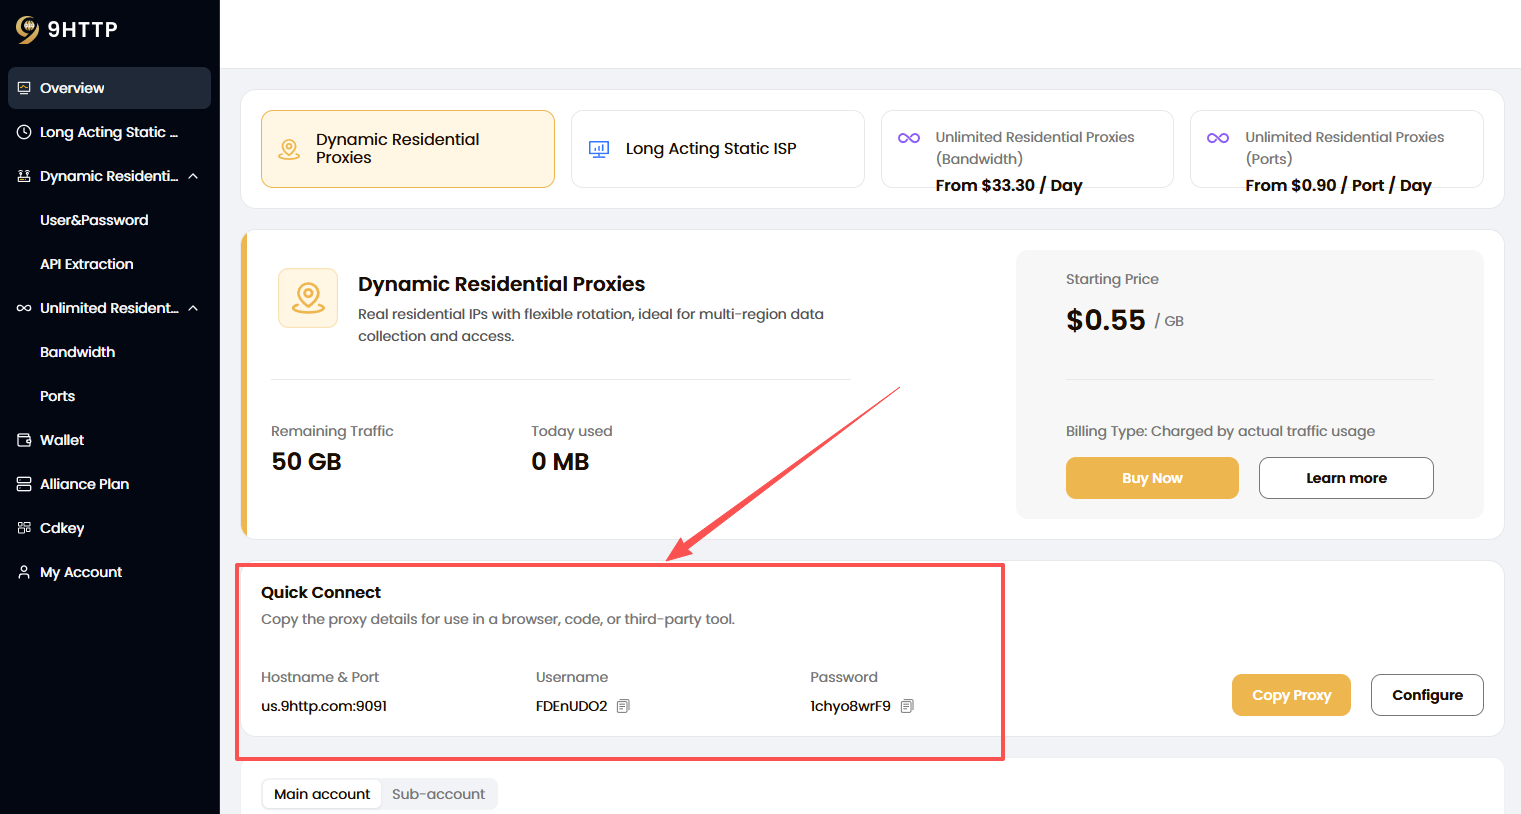
Before entering the details, note these distinctions:
- Proxy host and exit IP: The host is the entry point your client connects to. The exit IP is the address the destination website sees. These may differ.
- Proxy credentials and website login credentials: Use the proxy authentication details. Do not substitute your 9HTTP website login password.
- Dynamic and static proxy credentials: Do not mix connection details from different products.
If the username includes location or session parameters, copy it in full. Before proceeding, confirm that your plan is active, sufficient traffic remains where applicable, and your device can connect to the proxy server.
The 9HTTP website states that its proxy services are not supported for use in mainland China.
3. Configure a 9HTTP Proxy in BitBrowser
Step 1: Create a Browser Profile
Open the BitBrowser client, select the browser window section from the left-hand menu, and click the option to create a window.
Give the profile a recognizable name, such as “Ad Landing Page Verification,” and complete the remaining basic settings according to your workflow.
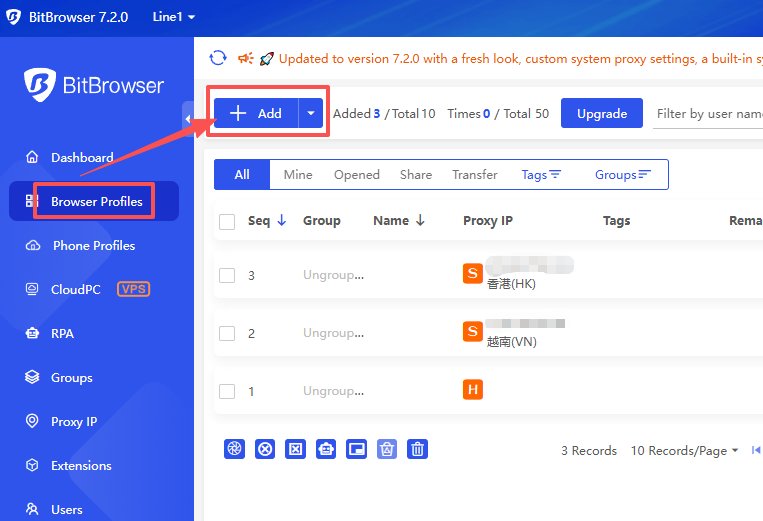
Step 2: Select a Custom Proxy
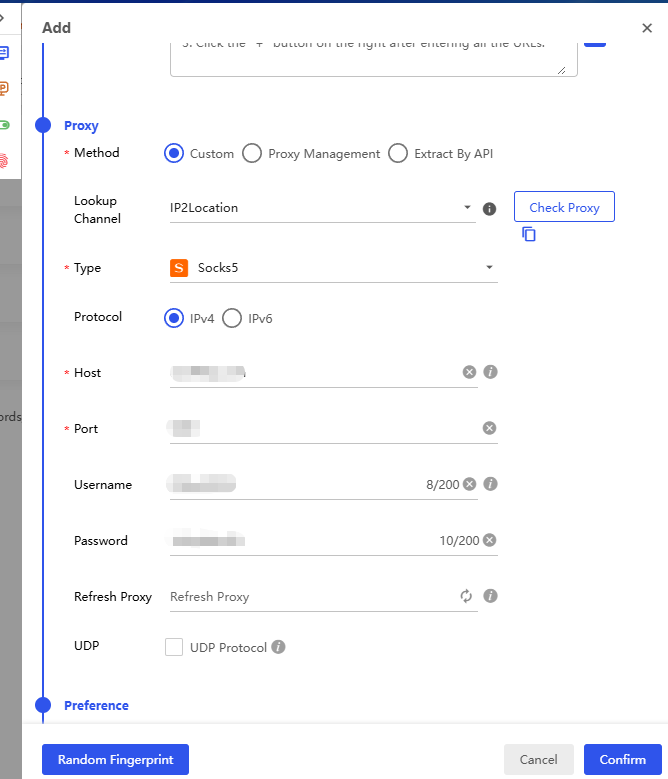
Find the proxy settings section and select the custom proxy option. Then choose the proxy type that matches your 9HTTP connection details.
For example, select SOCKS5 for a SOCKS5 connection or HTTP for an HTTP connection. BitBrowser supports proxy types including HTTP, HTTPS, and SOCKS5. The selected type must match the protocol supported by your proxy connection.
Step 3: Enter the Host, Port, and Credentials
Enter the details provided by 9HTTP into the corresponding fields.
| BitBrowser Field | Information to Enter |
|---|---|
| Proxy host | Server hostname or IP address provided by 9HTTP |
| Proxy port | Port number assigned to the connection |
| Proxy username | Complete proxy username, including any parameters |
| Proxy password | Corresponding proxy authentication password |
Step 4: Test the Proxy and Save the Profile
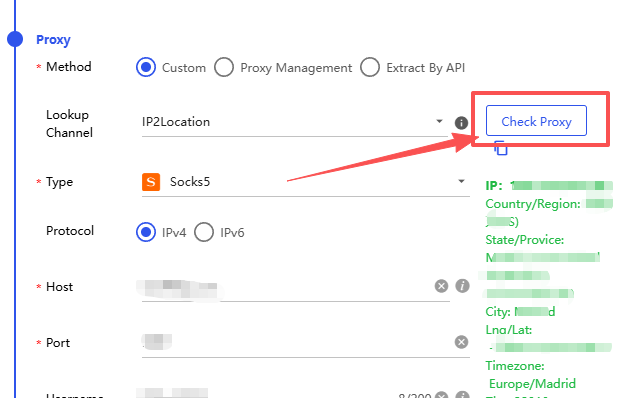
After entering the details, click the proxy testing button to check connectivity. Button names and locations may vary depending on the client version.
If the test succeeds, review the displayed exit IP and location, then save the profile.
A successful connection test confirms that the proxy worked during that test. You still need to verify the relevant business pages separately.
Step 5: Open the Profile and Verify Business Pages
Return to the profile list and open the profile you created. Visit the page you need to check.
For advertising verification, review the landing page’s language, currency, product information, and redirect destination.
Proxy location may not determine page content on its own. Websites may also use browser language, browsing history, and account region to select a version. Consider these factors when investigating differences.
4. Troubleshoot Connection Issues
| Issue | What to Check First |
|---|---|
| Authentication failure | Confirm that credentials are complete and contain no extra spaces |
| Connection timeout | Check the host, port, and network connectivity from your device |
| Connection stops working after a period of use | Check plan validity, remaining traffic, and credential changes |
| Exit IP changes | Review rotation settings and sticky session conditions |
| Proxy works, but a page does not | Check the destination website’s status, access permissions, and page settings |
Change one setting at a time and test again to make the cause easier to identify.
When contacting technical support, provide an error screenshot, the time the issue occurred, and your client version. Hide passwords in screenshots.
5. Frequently Asked Questions
Will the Exit IP Stay the Same After Closing and Reopening a Profile?
That depends on the proxy product and session rules. The profile saves connection settings, but a dynamic proxy may use a different exit IP when it reconnects.
Will Multiple Profiles Using the Same Proxy Details Receive Different IPs?
Not necessarily. Exit IP assignment depends on the proxy service’s allocation rules. Test each profile to confirm its actual exit IP.
Can I Configure Profiles in Bulk Immediately?
First, complete the connection test and business-page verification in one profile. Then expand the configuration to avoid repeating incorrect settings across multiple profiles.
Will a Proxy Always Make a Page Display Content for the Target Region?
No. A proxy provides a network exit, while page content may also depend on account region, language, and browsing history.
To begin, choose 9HTTP Dynamic Residential Proxies, Long Acting Static ISP, or a bandwidth-based or port-based Unlimited Residential Proxy plan. Then validate the connection in a single profile.
9HTTP provides a centralized dashboard and 24/7 technical support to help manage connection settings and usage.
This tutorial is intended for advertising display verification, market research, and authorized store management. When collecting data, operate in compliance with applicable requirements and follow robots directives, destination website terms, and relevant rules.